Showing posts with label DIY. Show all posts

Friday, January 08, 2016

The Best Glue for DIY Glass Gem Magnets

Mod Podge vs. Tacky Glue vs. Quick Grip 

Which of these 3 glues work best for making quick & easy DIY glass gem magnets or pendants? I put them all to the test!


Best Glue for DIY Glass Gem Magnets Crafts by The Funky Felter

After many years working as a professional crafter and also as a publishing Craft Editor, I have gone through an enormous amount of glue - all types of glue from simple white school glue to glue dots to industrial strength adhesives. I've used bottle after bottle, and quite honestly, I've used some bottles just once and set them aside because they didn't cut it for the craft at hand. The right glue matters! And, more importantly, the right adhesive for the right project matters most.

Friday, March 06, 2015

How to Make Felt Wool Balls

Felted Wool Balls or Beads DIY Craft Tutorial 

easily create homemade wool dryer balls or felted beads for decoration

how to make felted wool balls easy craft tutorial for dryer balls or decorations

Like many of you who have been wet felting or needle felted for a while, wool balls or beads are probably one of the first things you tried making. Me too! I have been creating handmade felted wool balls in all shapes, colors and sizes for several years now. I have used them mainly in making felted jewelry and also as embellishments for fiber art pieces. 

You can see many examples of what I've done with my own felt wool beads at my Flickr gallery. I still have shoes boxes full of all sorts of colors that I keep on hand for future projects. Honestly, I just find them fun and so easy to make that I use up my scraps on them. My five year old also likes making them with me as they are a very kid-friendly felting project.

Friday, January 24, 2014

Needle Felted Heart Pouch DIY Craft Tutorial with FREE Printable Instruction Sheet

Handmade Needle Felt Polka Dot Heart Pouch

Make this for your Valentine or any special someone!

The Funky Felter Needle Felted Heart Pouch Craft Tutorial

This sweet little heart pouch measures about 3 inches wide - the perfect size for a few treats or a love note! It is an easy beginner project made using a cookie cutter and minimal wool roving. Personalize it by adding dots, stripes or get fancy and put your special someone's initials on it.


Free Printables for Crafts, Kids Activities, Bible Study, and Christian Education at 123 Journal It Publishing

Download Free Printables Now


MATERIALS:

Wool roving in choice of colors
Medium gauge felting needle
Dense foam for felting base
3 x 3 inch or larger heart shaped cookie cutter
Paper and pen for a love note or treats

CLICK HERE for the free printable instruction sheet with step-by-step photos and felting tips. (If sharing, please share this post and not the direct link to the instructions. Thanks!)


Wednesday, January 22, 2014

DIY Craft Felt Monster Puppet with FREE Pattern

Handmade Craft Felt Monster Puppet For Kids

Free Adjustable Size Pattern to Print

The Funky Felter Craft Felt Monster Puppet Tutorial

This is just the kind of craft that my 4 year old loves, loves, loves to play with when I'm done making it. I often have to wrestle these craft felt creations from her for a few minutes in order to take a quick photo for the blog. This cuddly felt monster puppet can be made in whatever colors your kiddo likes best. Easily cut out and make multiples for a kid's party or make your own craft kits for a group of kids to create their very own monsters. 


MATERIALS:

2 sheets red craft felt for the body
Scraps of blue craft felt for the eyebrows and mouth
Scraps of white craft felt for the teeth
Two 1/2 inch wide or larger wiggle eyes
1/2 inch wide or larger red pompom for the nose
Hot glue gun and glue sticks
Embroidery floss and tapestry needle (see craft tips)

CLICK HERE for the free printable pattern. (If sharing, please link directly to this post and not the printable itself. Thanks!)

Craft Tips: I hand stitched the edges on this little monster, but you could easily machine sew the edges or adhere them together with the hot glue gun or other sturdy permanent glue. As always, use caution with a hot glue gun around young children. Be sure the adults in charge do the assembly!


INSTRUCTIONS:

First click on the link above to access the free printable. Download and print the pattern. Size the pattern up or down as needed to fit your child's hand. Using the red craft felt sheets, cut out two pieces for the monster's body according to the pattern. Then cut out pieces of blue craft felt for the eyebrows and mouth and pieces of white craft felt for the jagged teeth. 

Using the hot glue gun, adhere the wiggle eyes onto one of the body pieces. (See photo for approximate placement of all pieces.) Then adhere the eyebrows on top of the eyes slightly. Only adhere at the bottom edge of each eyebrow leaving the top unglued. In the same manner, adhere the jagged teeth next a couple inches below the eyes. Then adhere the mouth and pompom nose on top of the teeth.

Next align the front and the back body pieces. Either hand stitch, machine sew or glue the edges in place all around the monster's body. Leave the straight bottom edge open to insert a hand for the puppet.

Now go make several and pass them out to an excited group of kiddos!

Monday, December 09, 2013

DIY Recycled Cereal Box Christmas Trees Craft Tutorial

How to Upcycle Boxes into Quirky Christmas Trees

Cover your recycled trees in felt, paper, gift wrap or fabric scraps!


Recycled Cereal Box Christmas Trees Tutorial

My family goes through an abundance of cereal as well as other boxed items like mac and cheese, gummy snacks and pop tarts each week. This leaves at least a few of those thin cardboard boxes lying around to be recycled on trash collection day. I decided to experiment with a couple of the larger sized cereal boxes and came up with these quirky leaning Christmas tree decorations. For this DIY project you can really use any thin cardboard box to make a tree so pick and choose what size you want from your own recycleables.


MATERIALS:

Recycled Cereal Box Christmas Trees Tutorial materials
Recycled thin cardboard box (like a cereal box)
Pencil and ruler
Hot glue gun with glue sticks
Craft felt sheets, paper, gift wrap or fabric
Ribbon or other embellishments
Yellow craft felt sheet or card stock
Small star shaped cookie cutter

CRAFTY TIPS:  If kids will be helping you, I recommend swapping out the hot glue gun for some fast drying tacky glue or using a low temperature glue gun instead and supervise well. For the embellishments, you can purchase sticky back felt or foam shapes at craft stores for easy decorating with kids.

 INSTRUCTIONS:

Step 1
 First open up the box and lay it flat with inside facing up. Then using the ruler and pencil, draw diagonal lines down the center of each large section. Start at the top corner by the spine drawing a straight line to the opposite bottom outer corner. Then lay the ruler along the drawn lines and draw another line about 1 inch away parallel to the original drawn lines. (I made this line dotted in the example photo.)


Step 2
Cut on the outer dotted lines forming a triangular shape from the opened box. Then fold over to crease the inner lines forming flaps on each diagonal side.

Step 3
At this point, I turned the triangular cutout over so that the cereal box graphics would be on the inside, but you don't have to. Using the existing side spine of the box, fold the triangular side sections inward. Then overlap the end flaps about 1/2 inch (or so that it is about the same width as the box spine) and glue in place. Also overlap the existing bottom flaps and glue in place. Trim any odd pieces as you go and lastly glue the top existing flap over (if there is one). You should end up with a slanted hollow triangle shape for your Christmas tree. That sideways slant is why I call this a quirky little tree, but that's part of the charm!


Step 4
Now that you have your quirky tree shape, it is time to cover it. (I used a few craft felt sheets to cover this tree, but you could also use scrapbook papers, gift wrap or even fabric scraps.) Lay the tree shape on the felt sheet leaving about an inch of space all around. For felt, use a piece of chalk to trace about 1-1/2 inches from the slanted edge. Also trace little square cutouts at the bottom corners. Then cut out the felt covering for that side. Flip the tree shape over and trace another piece of felt as before to cover the other side.


Step 5
Using the hot glue gun, adhere the felt cutouts to each side overlapping on the sides as you fit it onto the tree shape. Trim any excess bits as needed. And, if you don't quite cover the sides where it overlaps, cut some strips to fill in where needed.


Step 6
Once you've covered your quirky tree, it is time to decorate! For the star, I used yellow felt tracing a star cookie cutter shape onto it. Then I cut it out and glued it to the top of my tree. You could use a premade star or something entirely different to top your tree. Wrap ribbon around it as a garland or embellish with sticky back felt cutouts or other fun stickers. Make it your own and dress it up however you like!

DIY Recycled Cereal Box Christmas Trees Tutorial

Friday, December 06, 2013

Quick & Easy Pouch Ornament DIY Tutorial

Make Mini Hanging Paper Treat Bags for the Christmas Tree

Fill them with wrapped candies, small toy favors or even gift cards!

Paper Pouch Ornament DIY Tutorial

Do you have a bunch of coworkers, kid's teachers or classmates, fellow Bible study members or just a big group of acquaintances to give some little Christmas gifts to? Or maybe you need to fill a display tree with some uniquely cute ornaments. I believe these super quick & easy treat pouches could be your answer. 

Free Printables for Crafts, Kids Activities, Bible Study, and Christian Education at 123 Journal It Publishing

Download Free Printables Now


You can create several of these in a flash with time to spare for stuffing them too! Don't forget to get the kids involved!

Paper Pouch Ornament DIY Tutorial materialsMATERIALS:

4.5 x 6.5 inch piece of card stock
Pencil and ruler
Scissors
Decorative edge scissors (optional)
Hole punch
Glue stick (or adhesive runner)
1/4-inch wide ribbon for handle
Sticky back ribbon, paper trim or other embellishments

CRAFTY TIPS:  The easiest way to make several of these at once is to use a colorful 4.5 x 6.5 inch scrapbooking mat stack. Make a larger pouch by using a larger size rectangle base. And, you can experiment with your base too by using stiffened felt, corrugated cardboard or some other sturdy material to create the pouch.

INSTRUCTIONS:

Step 1
Fold the card stock in half lengthwise. (If it is patterned, be sure the pattern faces out.) While folded in half, use decorative scissors to cut the unfolded edges. Unfold card stock with inside facing up. Measure about 1/2 inch from each long edge and draw lines on each side to mark it. Fold over and unfold to crease the paper on the drawn lines. Then cut a 1/2 inch slit along the center creased line to where it meets the side creased lines. Now you've created two sets of flaps on the sides.


Paper Pouch Ornament DIY Tutorial step 1


Step 2
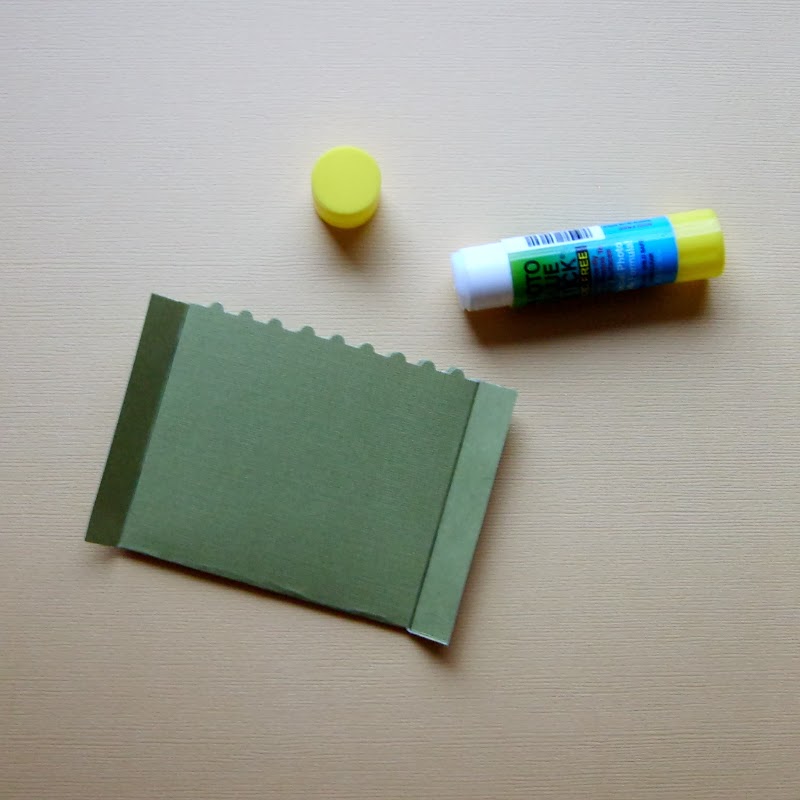
Fold one set of flaps (opposite each other) inward. Apply the glue stick to the back of the folded flaps. Then fold the flaps forward to meet the inside of the opposite half of the card stock rectangle. Press and hold in place for a few seconds until the glue dries. Now you've created the interior of the little pouch.

Paper Pouch Ornament DIY Tutorial step 2


Step 3
Apply the glue stick to the other set of flaps. Fold them onto the back of the pouch. Press and hold in place until the glue dries. (If needed, you can use paper clips to hold the flaps in place while they dry and work on making the next little pouch.) Use a standard hole punch to make a hole in each upper corner of the pouch.

Paper Pouch Ornament DIY Tutorial step 3

Step 4
For the handle, cut about an 8 inch long piece of ribbon. Thread each end through a hole starting at the back of the pouch. Double knot each end on the front side of the pouch and trim the ends at angles. Add a line of sticky back ribbon, paper trim or other fun embellishments to decorate the pouch. You could also add a name to personalize it or a gift tag sticker.

Paper Pouch Ornament DIY Tutorial for Christmas

Tuesday, February 09, 2010

Handmade Felted Soap Tutorial

How to make a bar of handmade felted woolly soap! 
(Please read all instructions thoroughly before beginning.   For a larger view of photos, click on each to open it full-size in a new window.)

Materials:
Approximately 1/2 ounce wool roving
1 rectangular bar of soap (3 oz.)
A small bowl
Access to warm water (a sink)
A hand towel or small cloth
A flat work surface
1 knee high stocking (optional)
Dish washing liquid (optional)


Free Printables for Crafts, Kids Activities, Bible Study, and Christian Education at 123 Journal It Publishing

Download Free Printables Now


Basic Instructions:

1. On a flat surface, lay out a thin horizontal layer of white wool, 8 - 10 inches long and 3 - 4 inches wide. (Figure A)
2. Put the soap bar lengthwise at one end of the wool and roll it up to loosely encase it in the wool. (Figure B)
3. Repeat steps 1 & 2 for the width of the soap bar. (Figure C)
4.  Now the soap bar should have one horizontal layer (interior) and one vertical layer (exterior) of wool. It should be fully encased.  (Figure D)
5. To add stripes, lay out two small pieces of colored wool horizontally. Put the soap bar lengthwise at one end of the wool and roll it up loosely. (Figures E & F) You can also add vertical stripes or abstract embellishments.
(Optional Tip: Especially for beginners and children, I recommend inserting the wrapped soap bar into a knee high stocking and loosely tieing the top.  This allows the fibers to stay in place better as you felt the soap.)

6. Hold the wrapped soap bar firmly. Sprinkle warm water over it until it is thoroughly damp.  Gently set aside. (Figure G)
7. Prepare a bowl of very warm water to finish felting the soap. 
(Optional Tip:  Add a drop of dish soap to the water to speed up the process.)
8. Continue to occasionally dip the soap in the bowl of water as you firmly hold the fibers into place. Press the fibers against the soap bar for 5 - 7 minutes. Do NOT rub the wool at this stage!  It will displace the fibers. (Figure H)
9. Once the fibers begin to mat together, you may gently pat and rub the wool for an additional 5 - 7 minutes.  (Figure I) (If following the first optional tip, you can take the bar out of the stocking at this stage.) The soap bar should be completely felted after a total of 10 - 15 minutes of continuous wetted agitation.  The exterior felted wool layer should be smooth and taut next to the soap bar when it is finished. (Figure J)

10. Thoroughly rinse the soap bar.  Pat with a cloth to remove excess water.  Lay flat to dry.  (Figure K) Allow to dry 24 - 48 hours.  Store in a dry place after each use.


Some More Examples...


You can find soap felting kits available in my Etsy shop and my ArtFire shop. It is a fun, easy beginning felting project for most ages.  It also makes a great natural all-in-one soap and scrubby to use or give as a gift.


Copyright © 2010 Shalana Frisby.  All rights reserved. May not be reproduced in any form without permission.

Thursday, January 28, 2010

How to Use Rubber Stamps to Make Easy & Creative Hang Tags for Your Handmade Gifts and Products

I've been meaning to post a tutorial on how to use my rubber stamps for a while.  This is the first post of a few that I have planned for a series of how to's highlighting my rubber stamps.  It is quite easy to use rubber stamps and make your own DIY style hang tags or gift tags for your handmade goodies.  Below you'll find a simple list of materials and instructions to get you started.  (And, by the way, you don't have to use my rubber stamps - any old rubber stamp will do of course!)

Must Have Materials:
Cardstock Paper
Scissors
Stamp(s)
Stamp Ink Pad(s)
Hole Punch

Optional (but helpful) Materials:
Paper Punches
Decorative Edging Scissors
Acrylic Stamp Block (if your stamps are unmounted)
Colored Pencils or Markers
Double-sided Tape
Decorative Ribbon, Thread, or String


Basic Instructions:
1.  Using your scissors and/or paper punches, create several sizes and shapes of small paper pieces.  Using your hole punch, create a place in each piece for a ribbon or string to go through for hanging.  

Handy Dandy Tip:  Do not limit yourself to simple circles or squares.  You can cut any shape that you'd like as long as it is fairly easy to do and is large enough for your stamp size.  Also, not all of your tags have to be the same shape.  Don't be afraid to experiment to find out what looks best for your purpose.


2.  If necessary, temporarily adhere your unmounted rubber stamp to the acrylic block.  (I use a little double-sided tape for this.)  Apply a liberal amount of ink to your rubber stamp using your ink stamping pad.  (You may want to test the ink color and consistency before applying it to your final tag paper.)  When the stamp is inked well, decorate your paper tags one at a time - re-ink your stamp between each stamping.  If your ink pad brand is not fast drying, allow the ink to dry for a while before moving to step three.

Handy Dandy Tip:  Not all images have to be symmetrical on your paper tag area, nor do they have to cover the entire tag.  Have fun with your stamping!  Experiment with placing the image off-center or letting it bleed of the edge of the paper.


3.  Once the ink is dried, you can embellish your tags further.  Add ribbon, thread, or string.  Use colored pencils or markers to color the stamp images and customize each tag.

Handy Dandy Tip:  You can use your stamping pad to create a colored edge around your tag by easily going along the edge of the paper.  It creates a nice outline effect.


(FYI - Click on any of the images above to get a close-up view.)


These are just a few of the hang tags that I came up with in one hour during a leisurely weekday afternoon.  If you are making hang tags for a show or special event, I recommend sketching out some ideas of what you'd like first to get organized and be consistent in your tag style.  I also recommend making up several (50 - 100) at once to save you time later on.  And, remember that it is okay to have some "Oops!" tags - just save them for later.  You never know when you might need a little tag for something here and there.

All of the stamp designs shown above can be found in my Etsy Stamp & Paper Shop as well as my ArtFire Shop.  I have close to 70 stamp designs available with many of them being specifically designed for creating tags and labels.  I also carry wooden block mounting kits and a limited line of hang tags and note cards if you aren't the do-it-yourself type.

Saturday, December 12, 2009

Thursday, October 23, 2008

Going Green can be super fun! I never realized all the eco-friendly items available until today.

Recently, I was looking at fiber art related DIY kits on Etsy. I found a really neat needle felting kit at Mary Jane's Attic which has a corn based eco-friendly foam pad. You can see it at the bottom of Mary Jane's Attic's photo above. How cool is that?! It is a very nice alternative to the polyurethane foam pads which are widely used. And, yes, I admit that is what I've been using for years. It has always been the most convenient thing to buy at my local hobby shop. Recently, I have been more conscious of "going green" in my daily life. I'm not a very trendy person so it is not about being trendy to me, but rather about conserving resources for the children that I'd like to have some day and also about saving money and energy in the long run.

After finding that super cool eco-friendly foam pad, I did a Google search to see if I could find out more about it and its manufacturer. Although Mary Jane's Attic has terrific needle felting kits, I really don't need one at this point in my feltmaking journey (believe me, I have too much wool and too many needles stocked up already!), but I was very intrigued by the foam pad itself. I only searched the internet for a few minutes and got side-tracked as usual, but I found an interesting site for eco-shopping called EcoShopper.

When I came across EcoShopper.net, I had to stop and browse. It opened my eyes to all of the eco-friendly products out there that are available. It baffles my mind that there could be a laptop made with cedar wood. It is not only beautiful, but highly functional as well. Go to their site and check it out! You have to see it to believe it! I imagine that I will be exploring EcoShopper.net even more to see what other neat items I can find. And, I will continue my search for the eco-friendly foam pads eventually, but I'm having too much fun now getting side-tracked.

Kudos to Mary Jane's Attic for being so eco-conscious with their DIY kits! You have introduced me to something new and valuable today. Thank you!

Tuesday, September 23, 2008

Customizable Rubber Stamps and the many, many uses for an Artist or Crafter: Hang Tags, Labels, and More!

After debating for several weeks on what to do for my clothing and accessory hang tags, I decided to order some customized rubber stamps and make my own. I had originally thought to just print some hang tags out (being a graphic design and all) or buy some cute ones from an Etsy seller, but being the hands on crafty gal that I am, I really wanted to physically make my own tags this time around. I also wanted to have what I needed to repeat that for later shows. With these things in mind, I decided to order some customized rubber stamps from RubberStamps.net which turned out to be a great place to buy stamps!

I had initially searched Etsy to buy some customized rubber stamps because there are several sellers who offer them there, but I found many of them to cost a bit more than I really wanted to spend on my small business budget. At RubberStamps.net, you can order many different sizes and styles. You can also upload your own black and white image to be made into a stamp. I was able to get four small customized rubber stamps in their art mounted style for less than $25 with shipping. And, they arrived in just five days!

As soon as I got the stamps yesterday, I had to try them out. (I know - I'm like a little kid with a Christmas present!) You can see an example of my logo sheep stamp and my basic company info stamp in the photo. That is a bright blue ink on some of my own handmade paper. The sheep stamp (1 inch X 1 inch) was from my original black and white artwork while the company info stamp (1.5 inch X 0.5 inch) was designed using their provided text options. I am very happy with the quality of the stamps for the price and can see myself ordering more in the future if necessary, or even if not necessary because it is so darn neat to have your own customized stamps!

I started thinking about all the uses for a customizable stamps now that mine have arrived. Here's some ideas for you (and me):
  • hang tags
  • clothing labels
  • return mailing label
  • customized "Thank You" notes
  • handmade business cards
  • package branding
  • artwork decoration
. . . and the list can go on and on and on . . .
I'd love to know your suggestions of how to make good use of a customizable stamp so please leave a comment with your suggestions.

Wednesday, July 16, 2008

All About Labels for Handmade Items: labeling and the law, a DIY clothing label tutorial, and helpful resource links for label makers and sellers


If you sell handmade clothing or accessory items, labels are a necessity. Not only because it is good branding practice to attach your company information to anything that you sell, but also because it is the law that you include information about the origin, content, and care of your products on an attached label. Even for the little guy or girl with a small indie business, the US Federal Trade Commission requires that you declare certain information in the form of a label on your clothing, fashion accessories, and some other handmade items. Most beginning artists and crafters don't realize this at first, but it is important to know the laws and regulations pertaining to what you are selling - labeling is just one. I am not going to go into details of what is and is not required to be on a label because it can vary. Instead, I'm providing several links for you in my resource information below. Please read for yourself what is required specifically on your own product labels.

After realizing that I needed to label my handmade felted wool items, I researched what was necessary to include on those labels for my personal items. Then I proceeded to research how to make labels and where to buy already made labels. There are many options for labeling your handmade items. You can make labels yourself. You can purchase labels from another handmade artisan such as those found on Etsy. Or, you can buy professional quality woven labels from a manufacturer online or locally. The choice is up to you. I initially had chosen to make my own labels, but eventually I plan to invest in some professional quality woven labels for my felted fashion accessories.

Since many beginning artist and crafters are on a tight budget, the do-it-yourself method for label-making is usually the best route for a crafty person. Below are some basic instructions on how I have made my own sew-in labels. There are many other ways to make your own labels so check my resource information for some helpful links. And, if you have the cash and aren't feeling crafty about label-making, then purchase some from a handmade artisan or from an online company. You'll find suggested sources in my resource information below.


Making Your Own Labels (the funky felter way):

Necessary Materials:
computer, inkjet printer, scissors, a ruler, a table top work space, an iron, a pillow case to lay on the ironing surface, about a yard of thick cotton fabric or cotton canvas material, and machine washable dark t-shirt transfer paper.
*You will also need a graphic image and/or text information to put on your label; you can do this yourself via a computer or buy a design off Etsy (see resources).


Step-by-Step Instructions

1. First you will need to have a layout page of your labels in the form of a computer file for printing. If you are a bit computer design savvy, you can make an image or images to use as your label and a label template to make a page of labels. If not, you can use a simple word processing program to make text only labels with a template. Or, you can buy a label design graphic from a talented Etsy seller to use. (If you are wanting to make the label graphics or text yourself, you can find some helpful templates at Avery.com - their label templates work well for this project.)

2. Once you have your file page of labels ready to print, you will need to have an inkjet printer handy along with your dark t-shirt transfer paper (as seen in the photo). Simply print your page of labels onto the dark t-shirt transfer paper by following the instructions given on the transfer paper's packaging. Since the transfer paper is pricey, you might want to only print one sheet at first and follow-through all the instructions to see how the labels turn out.


3. After you've printed a page of labels on the transfer paper. Follow the instructions on the transfer paper's packaging to iron it on to the thick cotton material or cotton canvas (as seen in the photo). I suggest that you cut your fabric to the size of the transfer page prior to ironing it on to make it easier to handle during the process.

4. Once you've ironed the transfer page onto the fabric according to the transfer paper's packaging instructions, let it sit for a few minutes to cool. Then you can remove the parchment paper backing before cutting out your labels. Once your labels are cut out, you can sew them onto your items.


Another Way to Make Easy Labels:
If you'd prefer an even easier way to make labels...... you can use a customized stamp, fabric ink, and ribbon. Simply ink up your customized stamp and put it on cut sections of ribbon. You can then sew the ribbon in as a label.


RESOURCE INFORMATION

US Label Law Information:
USA Textile Labeling Requirements When Selling Your Handmades on About.com

Tutorials for Label Making:
Craftster.org's Tutorial for Personalized Labels
Make your own labels by Allyson Hill

Etsy Sellers Who Make Labels:
Jennifers Jewels
Custom Courture Label Co
Mommie Made It
Rohm Custom

Etsy Sellers Who Design Label Graphics:
Color Fiesta Graphics
Pixel by Pixel

Commercial Label Makers:
Name Maker
Distinctive Designs 21, Inc.
Northwest Tag and Label
Heirloom Labels
General Label
Clothing Labels 4U
Lucky Label


**Please note that I, the funky felter, am not affiliated with any of the suggested label sellers, nor do I endorse or recommend their services. I am simply providing their links as resources for you to evaluate.
Related Posts Plugin for WordPress, Blogger...